This post presents a solution to a blocking, quite frequent, situation often encountered when using the UVM Register Model. The UVM Register Model is a powerful tool for hardware verification, offering a high level of abstraction and a structured approach to handling registers and memories in a digital design.
Problem Description
The UVM Adapter can be configured to wait for the acknowledgement of the read access (see Code Section 1, taken from the uvm_reg_map.svh). This ensures that the data is correctly retrieved before the function returns.
task uvm_reg_map::do_bus_read (uvm_reg_item rw,
uvm_sequencer_base sequencer,
uvm_reg_adapter adapter);
//…
if (adapter.provides_responses) begin
uvm_sequence_item bus_rsp;
uvm_access_e op;
rw.parent.get_base_response(bus_rsp);
adapter.bus2reg(bus_rsp, rw_access);
end
else begin
adapter.bus2reg(bus_req, rw_access);
end
//…
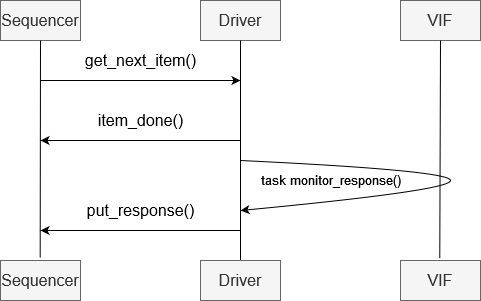
endtask: do_bus_readFor this to work, the driver needs to monitor the interface and notify the sequencer using the put_response() function from the seq_item_port. Figure 1 shows how an agent should be implemented to support the provides_response feature of the RAL model.
We identified two cases when the environment reaches a blocking state, when the provides_response flag is set.
Problem 1
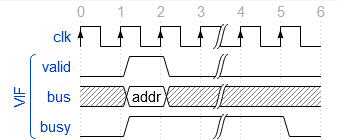
The used protocol is not of the request/response type. Figure 2 depicts a situation where one agent is used to issue requests targeting a register, and monitor the response. The protocol is different from a request/response one. The valid and bus signals are inputs to the RTL and busy is an output. The agent’s driver is not intended to monitor the interface, thus it does not know when a transaction is finished:
Problem 2
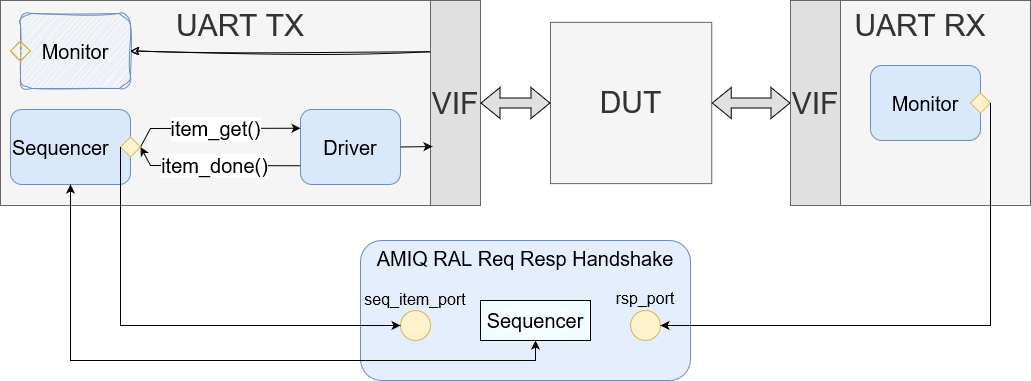
There is one agent that sends read/write requests and the response is monitored by a different agent. In Figure 3, the UART protocol is used. The TX agent drives the request (the transfer between the red lines) and the TX agent drives and monitors the response (the transfer between the blue lines):

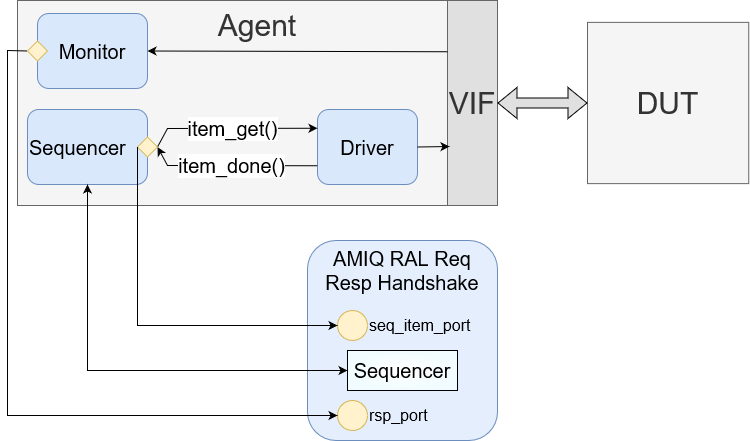
In both cases, the Agent would be similar to what is depicted in Figure 4

Solution – AMIQ RAL Req/Resp Handshake
The solution we provide is pretty straightforward, yet efficient and useful in our verification projects: manually provide the response to the sequencer, thus avoiding the blocking situation. The component receives transaction information from two ports (one connected to a monitor that detects the response and the other to the uvm_seq_item_pull_port from the sequencer) and puts the response in the sequencer handle.
Integration Flow – Sequence Diagram
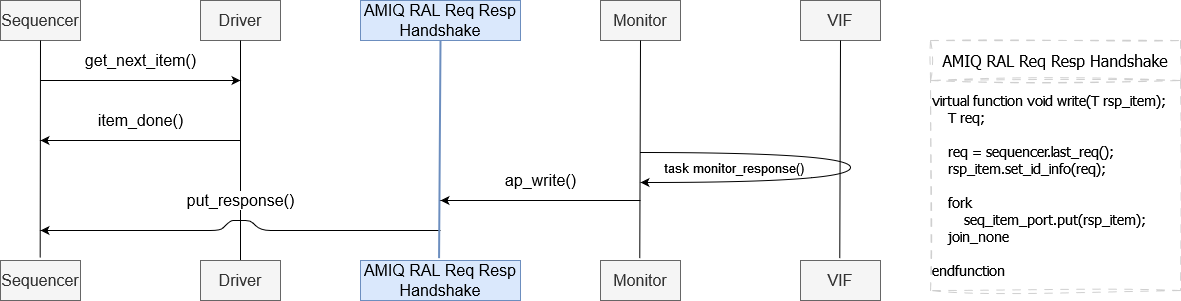
The AMIQ RAL Req Resp Handshake is going to be the middleman (see Figure 5), making sure that the driver is in sync with the provided response that is seen by the monitor.
Component’s Integration for solving Problem 1
Figure 6 shows how to connect the adapter to an Agent whose driver does not monitor the response (in a REQ/RESP protocol).
Component’s Integration for solving Problem 2
Figure 7 shows how to connect the adapter for Problem 2. We connect to the responder’s monitor port to put the response on the requester sequencer
Example of How to Use the Register Adapter Handshake
Please check out our repository. There is an example of how to integrate the component (we simulated the first problem).
Brief Description of the Testbench
There is an RTL module (rtl/amiq_simple_reg_file.sv) that accesses some registers.
We designed an agent, AMIQ Simple – Memory – Interface Agent (tb/amiq_smmi/amiq_smmi_agent.svh) to drive read requests. The agent’s driver can be configured to monitor the response using the knob send_response. If it is set to 1, then the driver will behave as it is described in Figure 1, otherwise, it will be similar to Figure 4. You can control this knob from the command line, using the plusarg +send_response=<value>.
The Register Adapter is connected as shown in Figure 4 and can be toggled on/off using the configuration knob instantiate_the_ral_handshake_adapter. This knob can also be controlled using the plusarg +instantiate_the_ral_handshake_adapter.
Interesting Scenarios
The testbench was designed to simulate both the problem and the solution to it.
The provides_responses field in the amiq_smmi_reg_adapter is enabled by default, leaving us in one of the following situations:
- The amiq_smmi_driver monitors the response (send_response = 1, Figure 1), thus there is not need for the Register Adapter Handshake (instantiate_the_ral_handshake_adapter = 0 or 1 would cause the same effect)
- The amiq_smmi_driver does not monitor the response (Figure 4); here we can choose to
- instantiate_the_ral_handshake_adapter = 1, resulting in a configuration that is similar to the one in Figure 6
- instantiate_the_ral_handshake_adapter = 0, resulting in a simulation stuck in the uvm_reg_map, waiting for a response (e.g. rw.parent.get_base_response(bus_rsp); )
Steps to Run the Test Case
We created a test case in which there are a few read requests issued. To run it, follow these steps
%  <download the repository>
%  cd <repo_path>
%  export PROJ_HOME=$(pwd)
%  cd sim
%  xrun -f sim.options +UVM_TESTNAME=amiq_ral_sandbox_test +send_response=<value> +instantiate_the_ral_handshake_adapter=<value>
I hope you find this post useful, so enjoy!